Refraction
and imaging using lenses
When light travels from one medium into
another of different index of refraction it refracts,
i.e. bends. This happens as the light goes from air to glass or from
glass to water, etc. In this section we will see how lenses, which are
made of glass or other transparent material with an index of refraction that
is larger than air's, can be used to bend light rays so as to generate images
of objects. In particular, we will use the technique of ray tracing
to learn some basic, yet powerful, rules that allow us to determine the location,
size, and nature of these images. For simplicity, we will only consider
two types of lenses: double convex, and double
concave. These lenses are made of two spherical surfaces of equal
radii that intersect each other in either a convex or concave manner.
Convex lenses typically bend light rays "in" toward the lens axis
and in this sense are converging, while the concave
shaped lenses bend light rays away from their axis and are thus diverging.
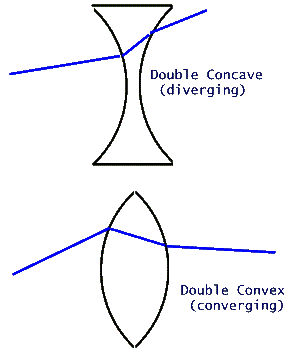
Light refracts on passing through a diverging
(top) and converging (bottom) lens, bending away or toward, respectively,
the lens optic axis.
I -
Converging Lenses:
To locate the image of a point source
we have to determine the single point where the rays leaving the source are
brought back to an intersection by the refraction of the light at the lens.
To do this, all we need to do is to find where two separate
rays leaving the source intersect each other. Then any other ray that
leaves the point source has to pass though this point too (why?). Two
very special rays for converging lenses are:
- the ray that strikes the lens parallel
to the lens center axis (the line that joins the centers of curvature of
the two lens surfaces); it refracts through the focal point of the lens.
Three such rays are shown below (blue colored ones).
- the ray that strikes the lens at its
center; it does not refract. The red colored rays shown below are
examples of this type of ray. Notice that the lens axis is in fact
another case of these rays.
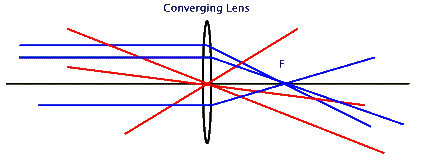
These two types of rays are all we
need to locate the images formed by a converging lens. From any point
source of light we can draw these two rays and see where they intersect.
The point of intersection is then the image. Another rather clever idea
is to use the law of reciprocity!
Remember that according to this law light rays do not care which direction they
travel in space. The material through which they travel matters, but the
direction (sense) doesn't. In other words the ray diagram for the refraction
that occurs at each boundary works no matter which way the light is actually
traveling. So, in the above ray diagram we could think that the light
is striking the lens from the left. In this perception the blue rays come
to a focus at the focal point, F, on the right of the lens. Or, we could
equally think that the light rays are striking the lens from the right.
Then the significance of the blue rays is that a point source placed at the
focal point on the right has its image appear at infinity (why?). In short,
light rays don't have directional arrows, according to the law of reciprocity.
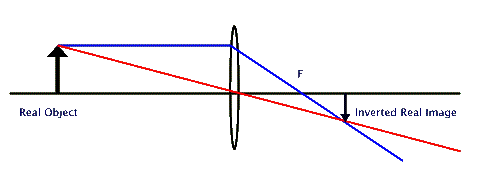
In the above ray diagram we have drawn our
two special rays for one point source that is at the "head" of our
object. These rays intersect at the other side of the lens creating a
real, but inverted image. (Notice that by the law of reciprocity we could
equally say that the real inverted object on the right creates
a real erect - not inverted - image on the left of the lens.)
If we move the object ( the one on the left) closer to the lens, the blue colored
ray still refracts the same as before, but the red colored one tilts to intersect
the refracted blue ray further away from the lens than before. So, as
this real image gets closer to the lens its image gets larger and larger, remains
inverted, and gets further and further from the lens. A critical point
occurs when the object reaches a focal length distance away from the lens, still
on the left side. In that case, as we saw above, its image will be at
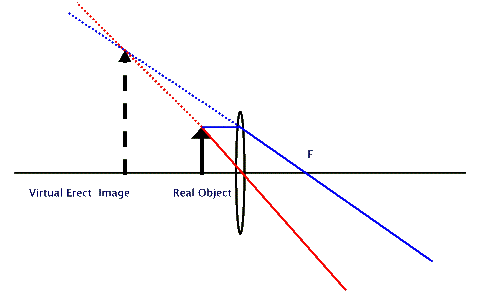
infinity! What happens when the object moves even closer to the lens than
the focal point? That case is shown below where you can see that no real image
forms. These virtual rays intersect to form a larger size, erect, but
virtual image behind the object (to its left). It is in this configuration
that we use magnifying lenses to see a small object (why? How do we see the
virtual image?).
Simple cameras
have a converging lens for image formation. The real image that falls
on the photosensitive film creates a chemical reaction that later on can be
developed into different shades and/or colors of the negative. The pictures
that we see are prints of these negatives. In today's digital and video
cameras, instead of film there is an array of photosensitive detectors.
When light falls on one of these detectors, this information is stored digitally
in the memory of the camera's computer. But the rest of a digital camera's
operations are the same as the conventional camera's. To properly place the
image on the film, the camera must be "focused" before taking the
picture, either manually or automatically. [Note, as an aside, that many
cameras send out an infrared pulse whose reflection from the object to be photographed
is then detected. The time delay is used to adjust the focusing automatically.]
In effect the camera lens is moved away or toward the film (or photosensitive
array) in order to change the image distance. If the image is formed behind
or in front of the film, then the light that falls on the film itself will produce
a blurred image. In such instances we say that the camera was not properly
focused. The
human eye works very much like a camera in terms of imaging.
Similar to a digital camera, instead of film there are photosensitive detectors
on the retina, in the back of the eye to record
the image. But unlike cameras the lens of the human eye is not moved in
relation to the retina. Instead, muscles pull on the lens of the eye to
change its shape and in this way alter its effective focal length and thus position
the sharpest possible image on the retina.
II - Diverging Lenses:
The two special rays for the diverging lens
are similar to those for the converging lens. Here again the rays striking
the lens center continue on without refracting (red colored rays shown below).
The ray that strikes the lens parallel to the lens axis refracts so that its
extension passes through the focal point on the same side of the
lens (blue colored rays shown below). In this case the refracted rays
do not intersect at all, so there is no real image formed by a diverging lens.
However, the extensions of the refracted rays do intersect on the same side
as the object. Now a real object infinitely far away has a point size
virtual image at the focal point on the same side of the lens!
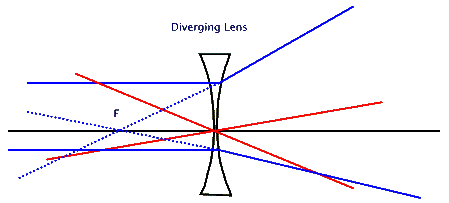
Again, we use these two types of rays to
locate the image of real objects, as shown below:
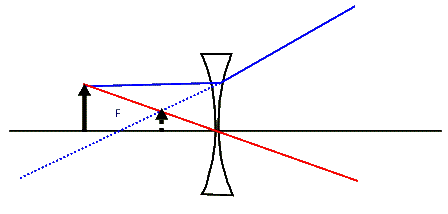
Evidently, in this case a real object
cannot have a real image! As the object approaches the lens its virtual
and erect image moves closer to the lens and gets larger (although never larger
than the object itself). We use diverging lenses in combination with
converging lenses for most practical applications. For example, myopic
eyes are prescribed correcting lenses which are diverging. The
un-corrected myopic eye forms an image of distant objects closer to the eye
lens than it should. So, the light (image) that falls on the retina
is blurry and not sharp. This image can be brought further back onto
the retina using a diverging correcting lens.
How about the size of a lens and its
quality? What are the important effects here? Simple ray tracing
shows us that the primary effect of lens size is its light gathering feature.
The larger the lens, the more light it can bring to the image. So, telescopes
need large lenses to let us see far and faint stars. Image blurriness
due to lens imperfections can have many different causes. The simplest
of these is lack of uniformity of the lens surface or material. If the
curvature of the lens surface changes over its different parts, then clearly
the lens ends up with an imperfect image forming capability. These imperfections
are called lens aberrations.
Questions
on imaging using lenses
Last Modified
Tuesday, 23-Sep-2003
malekis@union.edu


